
Bidding on an online loom auction? Ask the dealer some questions:
• Are any of the pins rusty, bent or missing?
• Are there any cracks or chips in the frame?
• Is the frame warped?
• Does the loom smell? (Old plastic looms sometimes have a horrid odor, caused by deterioration of the plastic.)
• Does the loom come with its weaving needle or tool?
• If instructions are included, are they original or photocopied? (Dealers who download files from this site and then include them to add value to their loom sale are cheating you. The files are offered here for FREE — for your personal use only.)
Vintage looms are usually not perfect, but minor rust on pins can be removed with crocus cloth or fine steel wool. A missing or broken Rug Weave-It peg can be easily replaced. Missing or broken metal pins are more challenging. I keep a broken loom on hand for “parts”.
An alternate weaving beginning is illustrated below. The beginning yarn does not fold or double back on itself and is smooth and flat, just like the ending.
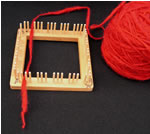 |
1. Place beginning yarn between second and third pins at bottom and carry to top, again between second and third pins. |
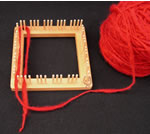 |
2. Wrap yarn to the left over the first two top pins; bring the yarn down to the left of first bottom pin (adjacent the side pins). |
 |
3. Make a simple overhand tie—like the beginning of tying your shoes. No knot! |
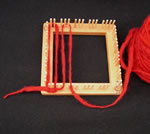 |
4. Proceed as in written manual instructions. |
The amount of yarn needed for the needle weaving step can be hard to remember if you work on multiple looms. Mark the bottom of the loom with this information! I mark right on the loom, but you can also mark it on a bit of tape. and I have no qualms about marking rows on the top of loom frame, if needed.
Weave in the starting and ending yarn tails before removing a piece from the loom. This allows the freedom to choose any type of joining method with any type of yarn and not have to go back and take care of all those cut ends.
Eliminate mistakes by weaving in front of a contrasting background. A light dishtowel on your lap while weaving with dark yarns, and vice versa, really helps you see individual threads. A light behind your loom is also helpful. If you are working with two colors of yarn in the same weaving, it’s easier to see if you start with the light yarn and finish with the dark. If mistakes are made, they can often be hidden. With an extra piece of weaving yarn, weave that row again, correcting the mistake while overlapping the existing row almost to the sides. Cut yarn flush at each end. This works best with wool and mohair, which are “grabby” and won’t work back out.
Non-elastic materials can be a challenge. Place the yarns in the first and third layers with as little tension as possible. Needle weaving will take up the slack very quickly and you may still have a tough time finishing the last few rows. When it gets really tough to work in the last rows, gently tug the warp threads toward unwoven side, on both the front and back. This will often give the extra warp room needed to work the needle through. Last ditch effort—break up the row by needle weaving over a few threads at a time.
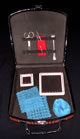 |
Containers for a work-in-progress can be elaborate or simple. A plastic sandwich box is just the right size for Weave-It looms that have no box. Make-up bags or large manicure kit bags usually have little compartments that are useful. If you are using a soft tote, keep the loom in its rigid box to protect the pins. |