eLoomaNation

Weaving Information from eLoomaNation

Altavista Babel Fish - Translate this page
Patterned Weave
I love plain weave, but a simple yarn and a very simple project might call for a something a little extra. The pattern book from Buxton Brook Looms (www.weavettes.com) is a wonderful resource, as are the old Loomette booklets and Bucilla Dictionary of Weaving Stitches.
 
The Loomette Handbook Loomette Weaves Buscilla Dictionary of Magic-Loom Weaving Stitches LOOMETTE HANDBOOK PDF DOWNLOAD(4.2MB)

LOOMETTE WEAVES PDF DOWNLOAD(2MB)


BUCILLA DICTIONARY DOWNLOAD (3MB)
©Bucilla Corporation. All Rights Reserved. (Permission granted to offer these files here for your personal use only.)

Don’t let the appearance of the written directions with all the O’s and U’s scare you off. Weaving patterns is much, much easier than those long directions would lead you to believe

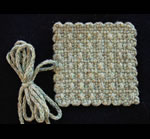
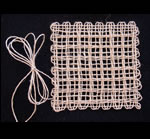
Photographed samples in the published weave pattern books are made with yarns that are about as heavy as the looms can handle. A lightweight yarn may look dramatically different! Look at the difference in these two samples. In the Weavette book, Licia Conforti calls this “Corduroy”. I weave it in linen and call it “Windowpane Lace”. Same loom, same weave, but what a difference the yarn makes!

Before Felting After Felting
How to Weave Patterns with More Than One Color
Weaving with more than one color of yarn adds a wonderful new dimension to textured weaving patterns, but the downside is that there are two ends to hide for every color used. Here’s a clean and neat way to finish them.
 
Finishing Two-Color Patterns - Step 1
 
1. Wrap the first three layers (or two, depending on your pattern) with main yarn and then cut, leaving a 4” yarn tail. With the contrast yarn, make a loose slip knot about 4” from the cut end.
Finishing Two-Color Patterns - Step 2
 
2. Thread the last main yarn tail through the slipknot of the contrast yarn.
Finishing Two-Color Patterns - Step 3
 
3. Snug the slipknot up to the corner before gently closing it, just enough to hang on to the main yarn. (Don’t pull too hard on the knot because you will take it apart in a few minutes.)
Finishing Two-Color Patterns - Step 4
 
4. Measure the contrast yarn and weave the square. Weave ending contrast yarn tail to the left, back through the last row that you wove, next to the pins (color on top of same color).
Finishing Two-Color Patterns - Step 5
 
5. Weave in the beginning main yarn tail, up, next to the pins (bottom left corner) as usual. Undo the slipknot on bottom right corner.
Finishing Two-Color Patterns - Step 6
 
6. Weave in the ending main yarn tail, up, next to the pins (color on top of color).
Finishing Two-Color Patterns - Step 7
 
7. Weave in the beginning contrast yarn back to the left, next to the pins (color on top of color).
Finishing Two-Color Patterns - Step 8
 
8. Trim and done! Notice that the pattern is still rather indistinct while the weaving is stretched on the loom.
Finishing Two-Color Patterns - Step 9
 
9. Remove patterned weaving from the loom and the design POPS! Steam blocking adds even more dimension to this soft wool yarn.

Interesting bonus—design colors are reversed on the back of two color patterns. This is “Double Outline Diamond” from the Weave-It Weaves booklet.

With ends neatly finished, you are free to choose any method of joining pieces and not have to worry about hiding them.

Weaving Patterns for Texture and Color
Text weaving patterns are long and confusing. You don’t have a visual reference and unless the rows are numbered on your loom (and many are NOT), you can easily get lost. I have developed my own graphic system. Once you learn it, you can glance at the graphic and know where you are in the sequence. I even keep the graphics on my iPod Nano to take wherever I go. No books, no paper, light traveling!

Almost all of the patterns presented here can be found in their original text versions in the books available on this website as free PDF downloads. Some are from the old Weave-It books and some from Loomette and Bucilla books. If the graphic eludes you, there is a reference to the source where you can find the original. There are a few original patterns as well, meaning that I haven’t found them in any book.

These patterns are for the 4x4 standard Weave-It loom, some of which had numbered rows. If you think you need the numbers, you can write them on any wooden loom with a fine Sharpie pen. Many (but not all) of the patterns will also work on the 2x2, 2x4, 4x6, and 6x6 looms. Experiment and extrapolate.

Graphics Explanation and Key

If you haven’t woven on your loom at all, please take an hour to learn and practice plain weave as presented in the loom manual before you go on. This will all make much more sense!

Each of the squares in the 4x4 grid (not including the numbered columns at far right and far left) represents a thread crossing (intersection)—weft passing either over or under warp. Loops outside the pins are NOT shown in the grid. The needle always goes over the outside loops.

Light gray squares=weft (from the second wrap) crosses over warp on rows that you do not weave. These unnumbered rows appear as you weave the numbered rows. They’re colored in the graph to illustrate that there is a plain weave row between each patterned row.

White squares=needle goes under a warp thread

Dark squares=needle goes over a warp thread

Parallel lines symbol=needle is passed between layers. This is used in some patterns to indicate that the needle tip is passed between the top and bottom layers of warp without weaving, parallel to the weft (horizontal threads from the second wrap) on either side of it. This could be represented with light and dark squares, but a symbol makes the process much easier to visualize.

White=UNDER
Dark=OVER
Parallel symbol=BETWEEN

That’s it.

To print the out the patterns below, click on a thumbnail to access a larger version. As time allows, I will add photos of samples.

pattern

The eLoomanator blogs here: http://eloomanator.eloomanation.com